Material Selection for Luxury Renovations: A Practical Guide
Master material selection for luxury renovations. Balance beauty, maintenance, and local climate needs to create high-end, durable, and cohesive living spaces.
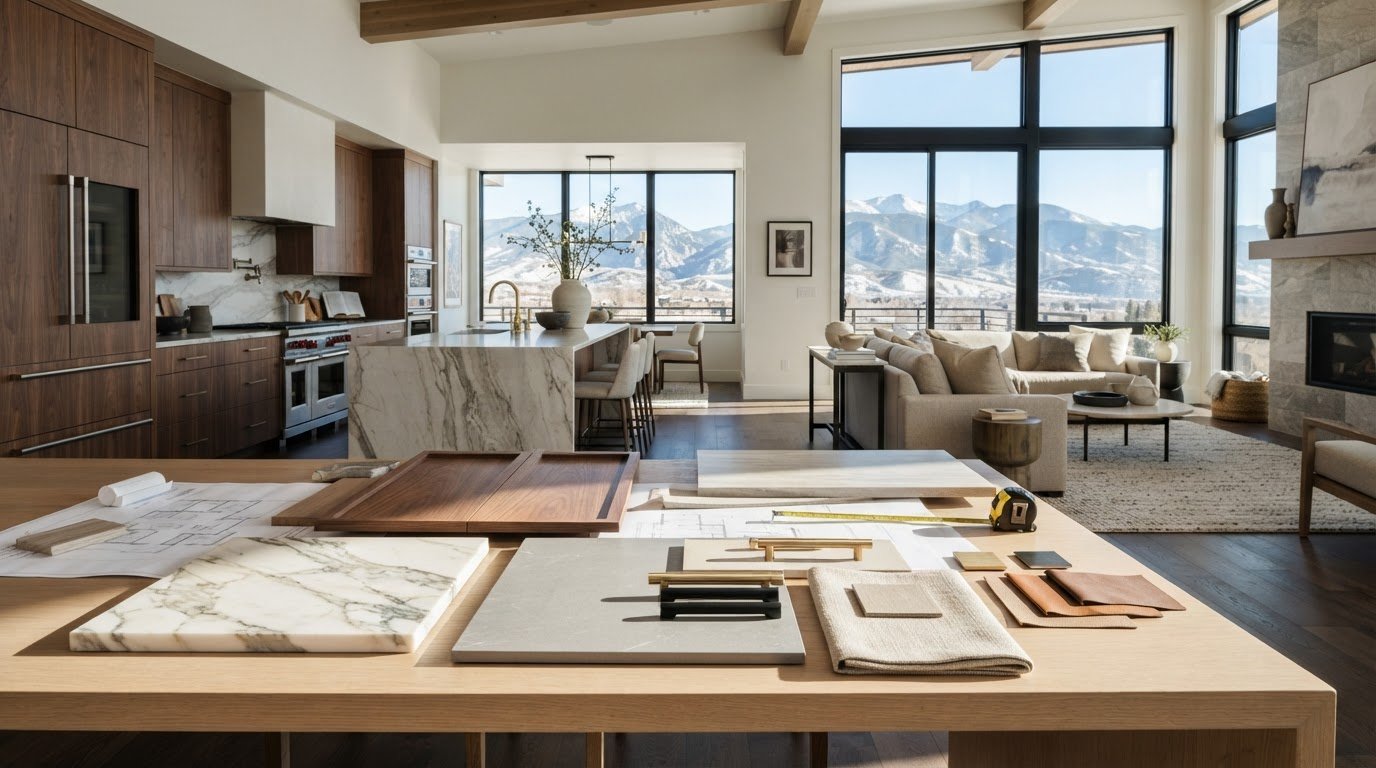
The most beautiful material in a showroom may be the wrong choice for your home. Effective material selection for luxury renovations weighs appearance alongside daily use, maintenance, installation requirements, and local conditions. In Denver’s dry, high-altitude climate, for example, solid hardwood can be more prone to shrinking and cracking as winter humidity drops.
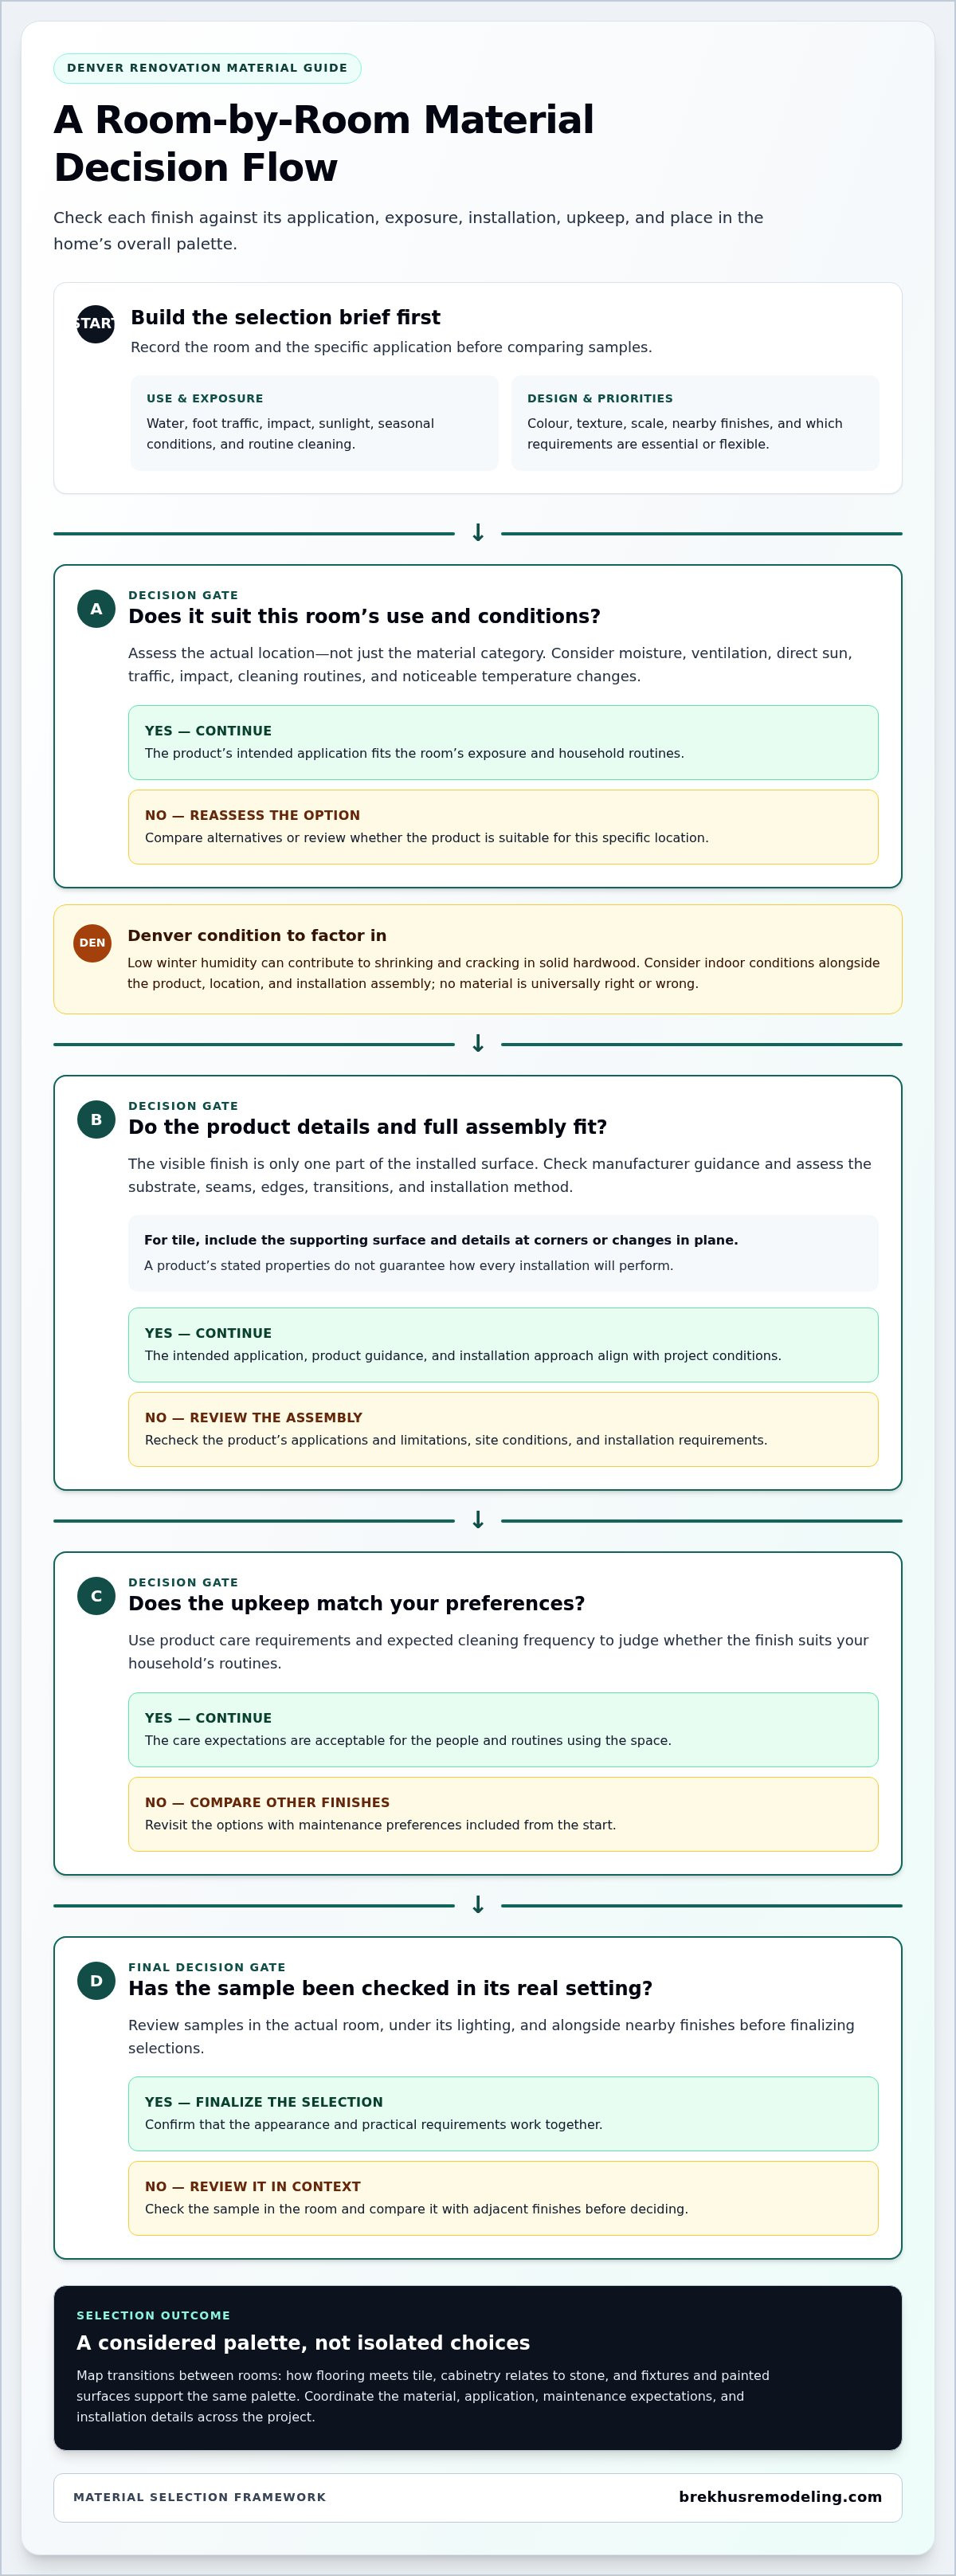
Premium finishes deserve careful comparison beyond their initial appeal. A stone surface, tile floor, or wood finish must suit the room, household routines, and level of upkeep you’re prepared to manage. Just as important, materials in connected spaces should work together as a considered palette rather than a collection of isolated choices.
This guide explains how to assess materials by performance, maintenance, design, and project context, with Denver conditions in mind. You’ll learn how to match finishes to the way you live, why installation precision matters, and how to create a cohesive renovation. Brekhus Remodeling handles residential renovation work, including tile, stone, and flooring installation that brings material choices together.
Key Takeaways
- Start with the room’s function, household routines, and maintenance preferences to establish a clear selection brief.
- Assess how a material’s location and installation assembly affect its performance in Denver-area conditions.
- Use consistent criteria to weigh appearance, upkeep, repairability, installation demands, and project fit.
- Review samples in the actual room and alongside nearby finishes under the room’s lighting before finalizing selections.
- Thoughtful material selection for luxury renovations connects design decisions with precise installation and coordinated finishes across bathrooms, kitchens, and other project areas.
Material Selection for Luxury Renovations Starts with the Project Brief
Luxury is not just a price point or a polished surface. It comes from choosing materials that suit the home, stand up to their intended use, and are installed with care. A clear brief gives material selection for luxury renovations a practical framework: define how each room needs to function, what visual character you want, and which requirements are fixed before comparing finishes.
Start with the household and the project scope. Record who uses each space, how often, and which routines affect the materials. A kitchen used for frequent cooking has different cleaning and traffic demands from a formal sitting room. In Denver, note direct sun, dry indoor conditions, and seasonal use where these affect a room’s exposure or comfort. For general background on material categories and applications, see this overview of building materials.
Separate visual priorities from performance requirements
Describe the look you want in observable terms: warm or cool colours, smooth or textured surfaces, large or small-scale patterns, and how new finishes should relate to existing trim, millwork, and architectural details. Then list practical demands separately, including water exposure, foot traffic, potential impact, and expected cleaning frequency. This makes it easier to spot when an attractive sample may not suit the room.
Mark each requirement as essential or flexible. An essential requirement might be a surface’s intended location or its relationship to architectural details you plan to preserve. Flexible preferences might include the exact shade, pattern variation, or scale. Separating the two helps you weigh alternatives when a preferred finish conflicts with project scope, installation conditions, or another fixed requirement.
Set a consistent brief across rooms
Organize selections by room and application. A surface used on a shower wall, kitchen counter, and entry floor faces different conditions, so the material name alone is not a complete specification. For each selection, record its intended location, appearance, maintenance expectations, and relationship to adjacent finishes. Product details and installation assemblies matter when comparing options.
Map transitions between rooms before settling on individual samples. Consider how flooring meets tile, how cabinetry relates to stone, and whether fixtures and painted surfaces support the same palette. A coordinated brief allows variation without visual fragmentation. For a project spanning several rooms, comprehensive residential full remodels benefit from decisions that account for the home as a connected whole.
- Room: Identify the space and the material’s specific application.
- Use: Note exposure to water, traffic, impact, sunlight, and routine cleaning.
- Design: Record colour, texture, scale, and nearby finishes to coordinate.
- Priority: Label each requirement essential or flexible.
Use this brief when reviewing samples and coordinating installation. It makes trade-offs visible early, keeps selections aligned across rooms, and gives each decision a clear purpose beyond appearance alone.
How Denver Conditions Shape Material Performance in Luxury Renovations
A material’s performance depends on more than its category or appearance. The same finish can behave differently depending on where it is installed, how much sun or moisture it encounters, and how the full assembly is constructed. In Denver, low winter humidity can contribute to shrinking and cracking in solid hardwood, so indoor conditions are worth considering before selection.
Material selection for luxury renovations should account for room exposure and installation requirements together. Denver homes can also experience strong sun exposure and seasonal temperature shifts. These conditions don’t make one material universally right or wrong; they make the specific product, location, and assembly important to assess. Use product documentation and actual site conditions to guide performance decisions.
Assess exposure, moisture, and everyday use
Evaluate each application on its own terms. A shower surface, dry hallway, sunlit room, and high-traffic entry have different demands. Note where water is present, how the room is ventilated, whether sunlight reaches a surface directly, and how often it will be cleaned. A finish suited to a low-use space may not match the routines or upkeep expectations of a busy household.
Also flag areas near exterior doors or windows and spaces that may experience noticeable temperature changes. These conditions call for a project-specific review, not a blanket assumption about a material’s suitability. Record the exposure alongside the intended use so you can assess samples against the room’s real demands.
Match durability claims to the installed assembly
The visible finish is only one part of an installation. Its substrate, seams, edges, transitions, and installation method all contribute to the completed surface. Tile, for example, involves more than the tile itself: the supporting surface and details at corners or changes in plane are part of the assembly. A product’s stated properties do not guarantee how every installation will perform.
Use manufacturer guidance to understand intended applications, care requirements, and limitations. Then consider whether the installation approach suits the project conditions. Include maintenance in the comparison from the beginning: a finish’s appearance is only one measure of fit if its routine care doesn’t work for the household.
- Exposure: Record sunlight, moisture, temperature variation, and traffic at the intended location.
- Assembly: Consider the substrate, joints, edges, transitions, and installation method.
- Upkeep: Compare care guidance with the cleaning routine the household can sustain.
These details connect material decisions to execution. For more on how installation and finish details shape a completed renovation, read about Brekhus Remodeling’s renovation work. Brekhus Remodeling brings material choices together with tile, stone, and flooring installation on Denver residential projects.
Compare Luxury Renovation Materials by Use, Upkeep, and Finish
A useful comparison looks beyond whether a material feels premium. Weigh its intended application, visual character, care requirements, repair considerations, and installation demands against the room’s needs. Natural variation may be a design asset in one space, while a more consistent appearance may better suit another. Neither preference is automatically superior; the right fit depends on the project brief and the specific product.
Use this table to organize options by category. Manufacturer guidance and the final installation details determine the requirements of a particular selection.
| Material category | Application and appearance | Maintenance and repairability | Installation demands and project fit |
|---|---|---|---|
| Stone surfaces | Can offer distinctive natural variation and visual depth; often considered for counters or other focal surfaces. | Care needs differ by stone and finish. Repair options depend on the material and the nature of the damage. | Planning for seams, edges, support, and transitions matters. Consider where the surface will be used and how its variation works with nearby finishes. |
| Tile | Available in varied formats, colours, and surface patterns for walls and floors. | Care depends on the tile, joints, and cleaning guidance. Repairs may involve replacing an individual piece, depending on the installation and availability of a matching material. | Layout, cuts, grout joints, corners, and transitions shape the finished appearance. Assess the intended location and installation assembly. |
| Flooring | Wood and other flooring categories create different visual textures and levels of pattern consistency. | Routine care and repair considerations vary by product and finish; review manufacturer instructions for the chosen material. | Account for room use, adjacent flooring, transitions, and site conditions. The best fit depends on both the application and installation requirements. |
| Cabinetry finishes | Can establish a room’s colour and visual rhythm, from consistent finishes to surfaces with more visible texture. | Cleaning and touch-up expectations depend on the finish. Consider how visible wear or localized repair may affect the overall appearance. | Coordinate finish samples with counters, flooring, and fixtures. Suitability depends on the project’s design priorities and daily use. |
Compare stone, tile, and countertop surfaces
Stone and tile selections are defined by more than their visible faces. Natural variation, surface finish, edge treatment, joints, and transitions all influence the final composition. In a bathroom, for example, wall tile, shower surfaces, and a counter are related applications, not interchangeable surfaces. Compare their colours and textures together, then assess the care and installation requirements for each location.
Evaluate flooring and cabinetry finishes
Review flooring and cabinetry samples beside one another under the home’s lighting. A finish can look different in a showroom than in the room where it will be installed. Check how flooring meets other surfaces and how cabinet colour relates to counters and fixtures. Include cleaning routines and repair expectations in the comparison instead of ranking options by appearance alone.
For material selection for luxury renovations, a premium label is only one consideration. Compare the actual product, intended application, care guidance, and installation plan as a complete decision. This helps preserve design intent while keeping each selection suited to its role in the home.
A Practical Material Selection Process for Denver Renovations
A defined sequence turns material decisions into coordinated project information. It reduces avoidable changes by connecting each choice to its application, site conditions, appearance, care requirements, and installation. Keep a written record as decisions develop so approved finishes can be carried consistently from review into construction.
- 1. Establish the brief. For each room, record its function, household routines, visual priorities, maintenance expectations, and project scope. Separate fixed requirements from preferences that can adapt.
- 2. Screen options by use. Remove materials that don’t align with the application or care routine before comparing colour and texture. Note water exposure, traffic, direct sun, indoor conditions, and temperature variation where relevant to the specific location.
- 3. Create a focused shortlist. Compare a manageable set of options against the same criteria: appearance, upkeep, repair considerations, product guidance, and installation demands. This makes trade-offs easier to see.
- 4. Review samples in context. Place samples in the actual room and view them at different times of day. Compare them beside permanent finishes, cabinetry, fixtures, adjacent flooring, and under the room’s lighting. A finish that looks balanced alone may read differently next to another surface.
- 5. Confirm and coordinate. Record the approved product information, finish, intended application, care guidance, and relevant site notes. Organize selections by room and transition before installation coordination begins.
Build a comparison shortlist and review samples
Use the project brief as a filter, not just an inspiration board. Once an option meets the room’s functional needs, assess its visual qualities alongside the finishes that will remain. Record the product details, selected finish, intended location, and manufacturer’s care instructions. Keep these notes with the sample so the visual decision stays connected to its intended use.
In Denver, include relevant site context in that record. Note sun exposure, dry indoor conditions, or seasonal temperature changes where they may inform a product’s application or care. Don’t assume a material category alone determines performance; consider the specific product and location.
Finalize decisions before installation coordination
Approved choices need to be clear for everyone coordinating the renovation. Group them by room, application, finish, and transition, then note how tile, stone, flooring, plumbing, and electrical work relate. This clarifies how each selection meets adjoining surfaces and how the work is organized. Changes are easier to assess when the complete set of decisions is visible.
Brekhus Remodeling’s residential work includes custom kitchens, premium bathrooms, and tile, stone, and flooring installation. The team coordinates material decisions with the work required to execute them. For a considered approach to material selection for luxury renovations and installation, explore residential remodeling services.
Bring Luxury Material Selections Together with Brekhus Remodeling
A successful finish palette is a set of connected decisions, not a collection of attractive samples. Each material has a place, an intended use, and a relationship to the work around it. Coordinating those choices with the renovation scope connects design intent to the installation details that shape the finished room.
Connect material choices with specialized installation
Tile, stone, and flooring choices are closely tied to how each surface is installed. Layout, edges, joints, and transitions influence the final appearance, and the material must suit its application. A custom shower, for example, brings tile choices into conversation with the shower configuration and related bathroom work. In a kitchen, stone surfaces and flooring need to work alongside cabinetry and fixtures.
Brekhus Remodeling’s residential work includes premium bathrooms, custom kitchens, custom shower installs, and tile, stone, and flooring installation. Coordinating these elements within the project keeps material decisions connected to the scope of work. Finish selection and installation planning can inform one another, rather than leaving transitions and adjacent surfaces until late in the process.
This approach is useful across multiple rooms. Flooring may continue from a kitchen into an adjoining area, while bathroom finishes may need to relate to the home’s broader palette. Coordinated remodeling helps preserve visual continuity while accounting for the distinct applications and installation needs of each space.
Move from a considered shortlist to a renovation plan
Before decisions move into the renovation plan, organize the information that supports them. A concise record gives the project a clear reference point and translates preferences into selections ready for coordination.
- Project brief: Note each room’s function, household routines, fixed requirements, and flexible preferences.
- Comparison: Record how shortlisted materials align with intended use, upkeep, appearance, and installation needs.
- Sample review: Note how finishes look in the actual room beside neighboring materials and under its lighting.
- Approved selections: Document the chosen finish, product information, intended location, care guidance, and relevant transitions.
These records give Brekhus Remodeling a practical foundation for connecting material decisions with residential remodeling work. For material selection for luxury renovations, the value lies in carrying the brief through to considered choices and coordinated execution, especially across bathrooms, kitchens, and surface installations. Each decision should make clear what the material needs to do, where it belongs, and how it relates to the finished space.
With a shortlist and project priorities in hand, take the next step toward a Denver renovation. Discuss your residential renovation with Brekhus Remodeling and connect your material choices to the work needed to bring them into your home.
Set Your Renovation in Motion with Confidence
The next step is turning preferred finishes into a clear direction for your home. A deliberate approach to material selection for luxury renovations keeps design intent connected to practical decisions as planning moves forward. It also gives you a stronger basis for weighing new choices without losing sight of what matters most in each space.
Bring your priorities, notes, and preferred visual direction into a conversation about the project. Brekhus Remodeling works with Denver homeowners on residential renovations, connecting planning with the construction and installation work needed to carry choices through. A focused discussion can help shape a renovation around your home and how you use it.
Discuss your Denver renovation with Brekhus Remodeling and take the next step toward a home shaped around your priorities. With a considered direction and careful execution, your renovation can feel cohesive, personal, and suited to the way you live.
Frequently Asked Questions
Which materials are considered best for a luxury renovation?
The best materials suit their intended use and support the home’s design over time. Stone may provide distinctive character in a focal area, while tile offers flexibility across different surfaces. Wood flooring can bring warmth to living spaces, and carefully selected cabinetry finishes can establish continuity in a kitchen. Compare specific products and installation requirements rather than assuming a premium label makes one category right for every room.
Are natural materials always better than engineered materials?
No. Natural and engineered materials offer different visual qualities and project considerations, and neither category is automatically superior. Natural stone may appeal to homeowners who value variation, while an engineered option may offer a more consistent appearance. Compare specific products by intended use, care instructions, limitations, and fit for the room. A sound choice reflects the renovation’s requirements, not a general preference for one category.
How do I choose renovation materials for a Denver home?
Choose materials with the home’s actual conditions in mind. In Denver, consider how direct sun reaches a room, how indoor conditions change through winter, and whether a surface is near an exterior opening. Flooring in a bright room, for example, deserves a different review from flooring in a shaded interior space. Check product guidance for the planned application and record relevant site conditions so decisions reflect the home, not just a showroom display.
When should I finalize material selections during a renovation?
Finalize selections early enough for them to inform project planning and installation coordination, rather than waiting until work is underway. Decisions affecting adjoining finishes, plumbing locations, or electrical details can influence how related work is organized. Keep a current record of approved choices and identify any remaining decisions. If a selection changes, update the record so the renovation team is working from the same direction.
How can I make luxury materials easier to maintain?
Choose products whose care requirements match the household’s routines, then follow the manufacturer’s instructions for cleaning and upkeep. Before committing, find out whether a finish needs particular cleaning products or regular care that may be difficult to sustain. In a busy kitchen, ease of routine cleaning may matter as much as appearance. Clear expectations help you care for the finish without relying on assumptions about a material category.
Can I combine different premium materials in one renovation?
Yes. A cohesive renovation can pair contrasting materials when each has a defined role. Use one surface as the visual anchor, then choose supporting finishes that share a compatible tone, texture, or level of visual detail. A strongly patterned stone surface, for example, may pair well with quieter cabinetry and flooring. Consider how the combination reads from adjoining rooms so transitions feel deliberate rather than abrupt.