Waterfall countertop installation costs and material choices
Plan your waterfall countertop installation with our guide on material costs, quartz vs. granite choices, mitered edges, and expert kitchen island design tips.
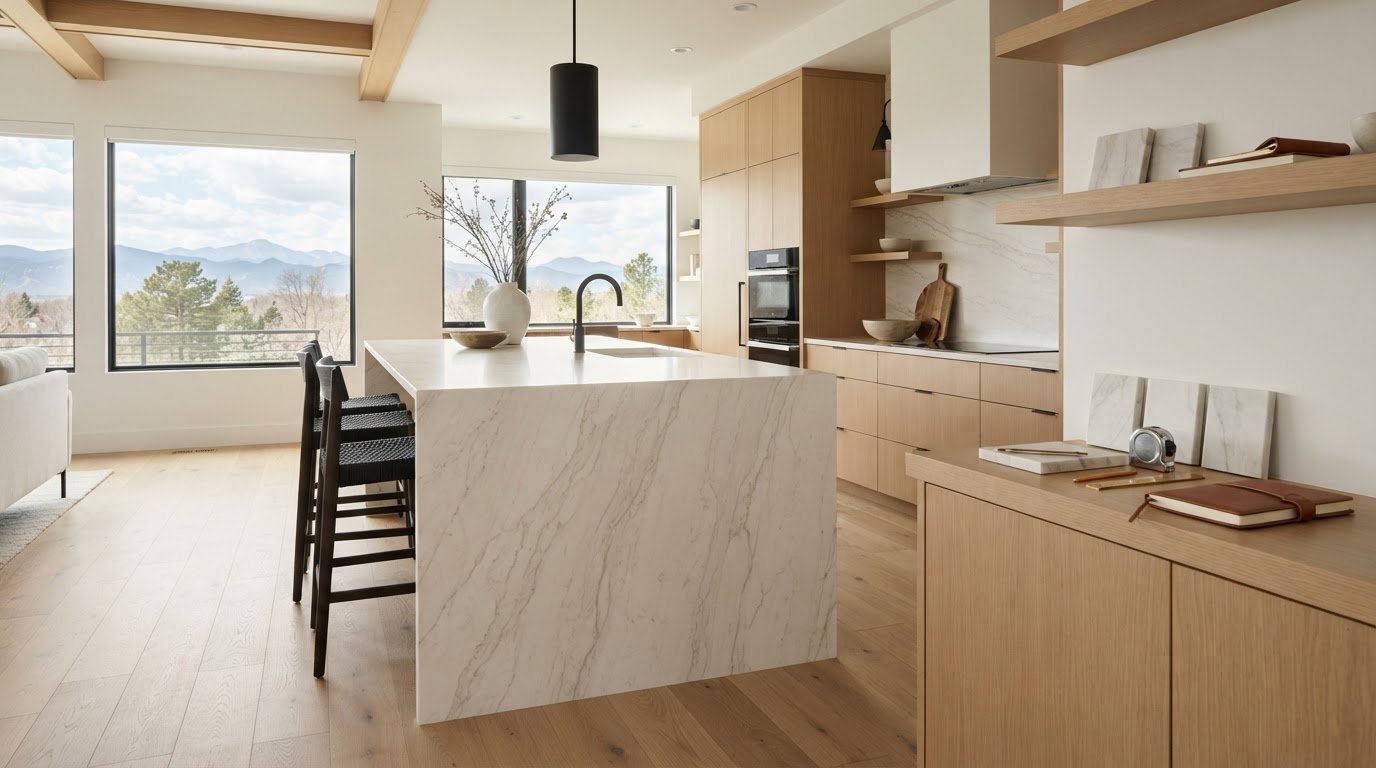
A precise waterfall countertop installation carries the counter surface down the side of an island or cabinet, creating a continuous vertical plane. The defining detail is the joint: mitered edges bring the horizontal top and vertical panel together in a clean transition. Material choice, careful measurement, and accurate fabrication all shape the finished result.
The effect can make an island feel more integrated with the kitchen, but it also uses more stone than a countertop that ends at the cabinet edge. Veining, pattern consistency, slab characteristics, and cut complexity all influence material selection and fitting. A striking design depends on both the surface and the precision of its assembly.
This article explains what defines a waterfall countertop, how quartz, granite, marble, and quartzite differ, and why adding stone affects material needs. It also covers mitered joints, measurements, and installation considerations that help create a well-aligned, durable finish.
Key Takeaways
- Assess the island’s dimensions and surrounding clearance together so the waterfall design fits the kitchen’s movement and layout.
- Plan for additional stone: the island may require a top, two outer sides, and two interior waterfall pieces.
- Compare quartz, granite, marble, and quartzite by pattern, maintenance, and performance to select a surface suited to your priorities.
- Prioritize precise fabrication and fitting, especially where natural veining must align across the mitered joint.
- Coordinate cabinetry and support with the countertop design so the finished island has a stable base and clean, aligned edges.
What is a waterfall countertop?
A waterfall countertop extends the counter surface vertically down one or both sides of a cabinet or island. Instead of stopping at the cabinet edge, the stone continues toward the floor, creating a connected horizontal and vertical plane. A mitered joint brings the two surfaces together at a clean corner. In a kitchen, the design also covers the cabinet’s exposed side.
Island size and surrounding floor space determine whether that vertical profile suits the room. A good-sized kitchen island is about three by five feet, and 42 inches between the island and surrounding counters is described as the usual clearance for comfortable passage. These figures are useful planning references, not a substitute for measuring the actual layout. A larger island can dominate a compact kitchen if it narrows the walking route.
Measure the island’s length, width, and height, then record the dimensions of each side intended for stone. Include the finished floor level and any cabinetry changes. Check clearances between the island, nearby counters, appliances, and doorways. For example, an oven door that opens into the aisle can affect how easily people move around the island, even when the counters appear well spaced.
Accurate site measurements also account for obstacles that affect fabrication and fitting. Note wall irregularities, cabinet overhangs, outlets, sinks, cooktops, and existing seams. Mark which sides need waterfall panels and where each panel meets the floor. These details establish the finished dimensions and reveal coordination issues before the stone is cut. A custom kitchen plan should treat the countertop, cabinets, and floor as connected parts of the same layout.
Waterfall edges often suit contemporary and transitional kitchens, where continuous lines complement simpler cabinetry. In a rustic or traditional kitchen, pronounced stone sides may compete with detailed woodwork. Material changes the visual effect: quartz offers consistent patterns and colors that can simplify seam alignment, while granite’s natural variation makes each slab distinct. Marble can create a strong visual line when its veining continues across the edge.
In the United States, countertop work does not follow one nationwide permit rule for every project. Local requirements depend on the jurisdiction and the scope of work. Changes involving plumbing, electrical systems, or cabinetry may bring additional rules beyond a surface replacement. Establish applicable local requirements before work begins, especially if a sink, cooktop, or outlet will move.
Advantages include a cohesive island profile and added coverage for exposed cabinetry. Trade-offs include greater material use, visible joints that require careful alignment, and a design that may feel too prominent in some kitchens. Marble also needs regular maintenance and sealing, unlike quartz, which is non-porous and low-maintenance.
Risks during waterfall countertop installation include chipped edges, misaligned seams, and panels that do not sit flush. Natural granite patterns can be difficult to align, while inaccurate measurements can disrupt the fit at the floor or cabinet. Heavy pieces also require controlled handling. Precise measuring, fabrication, and fitting reduce the risk that a visible corner or joint will compromise the finished appearance.
Additional stone material costs
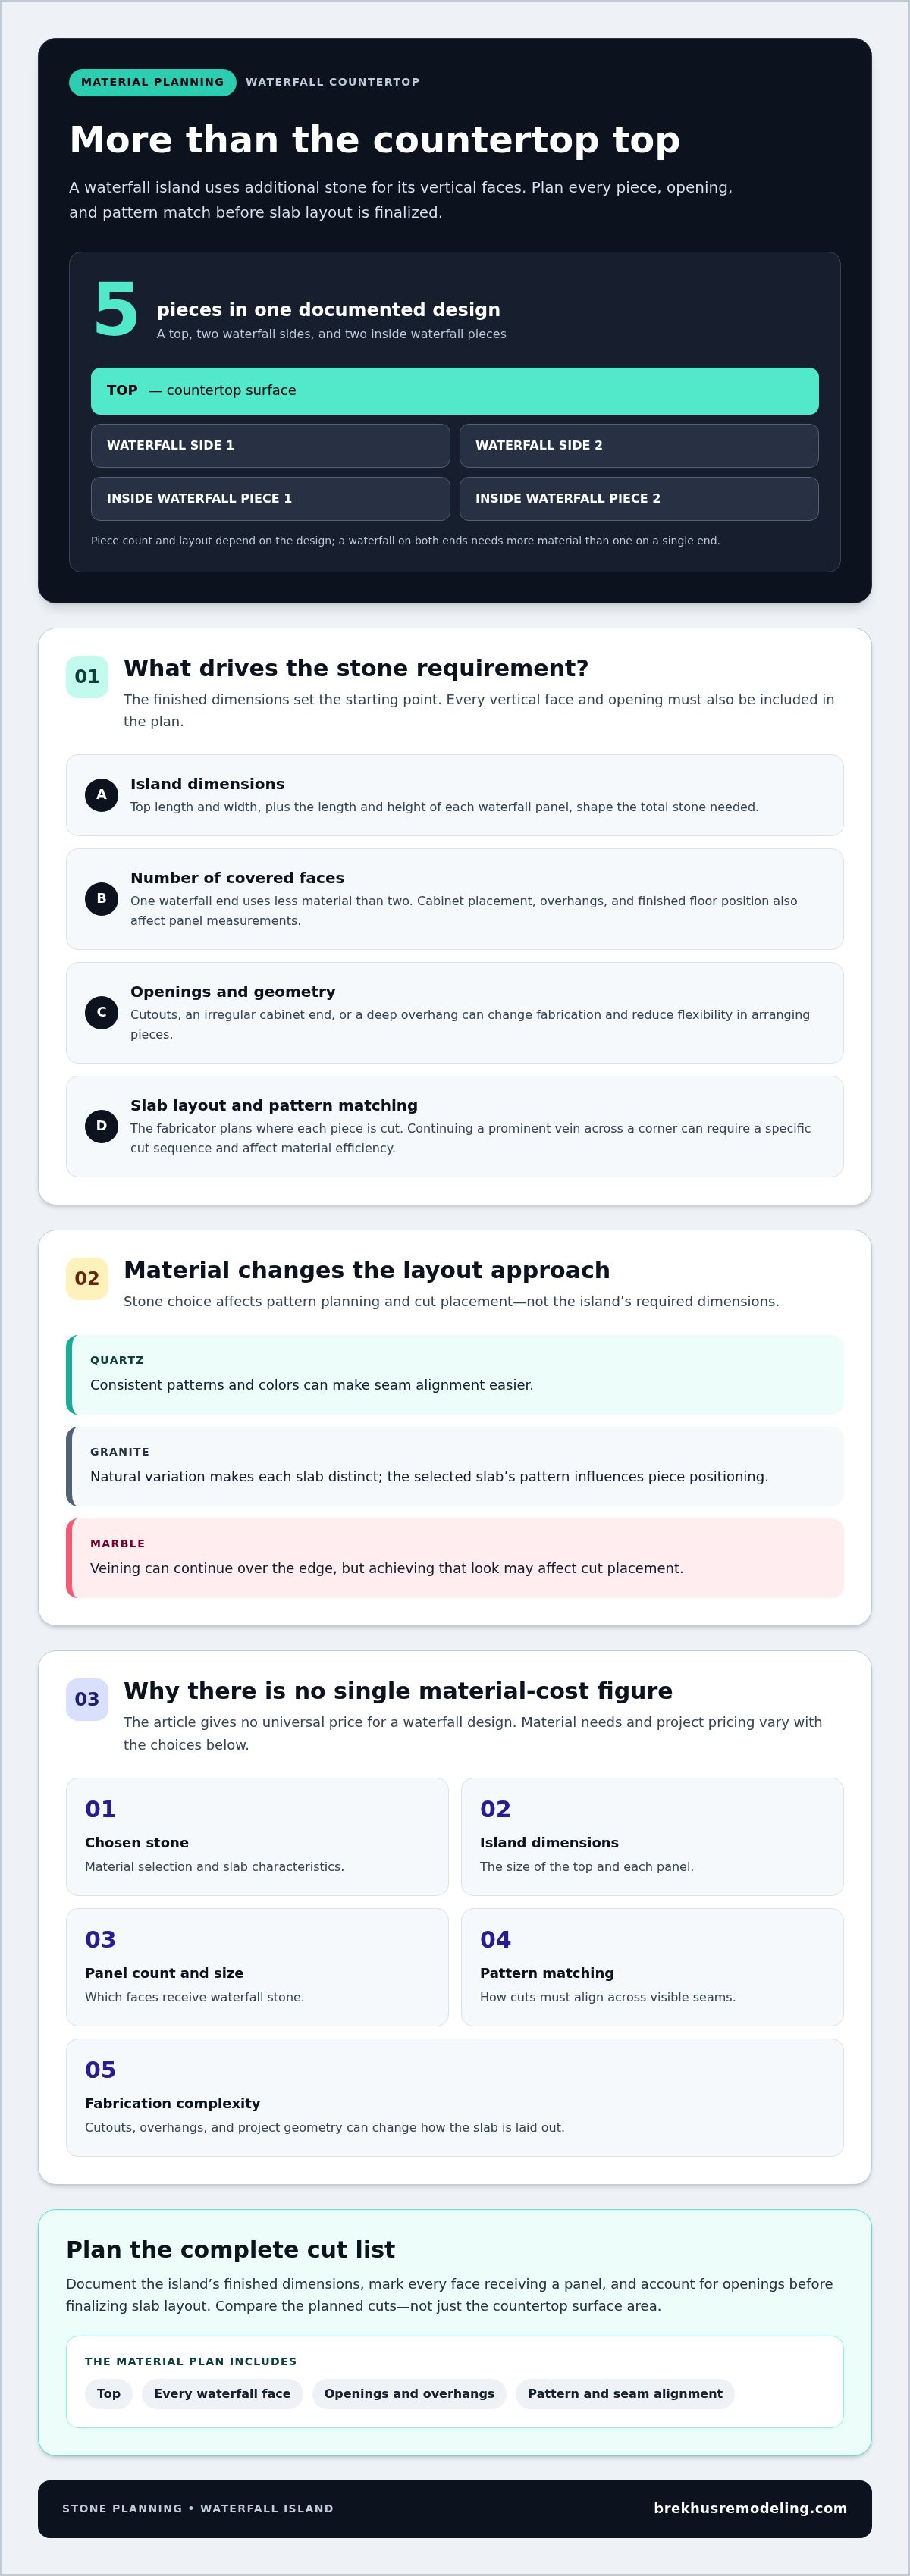
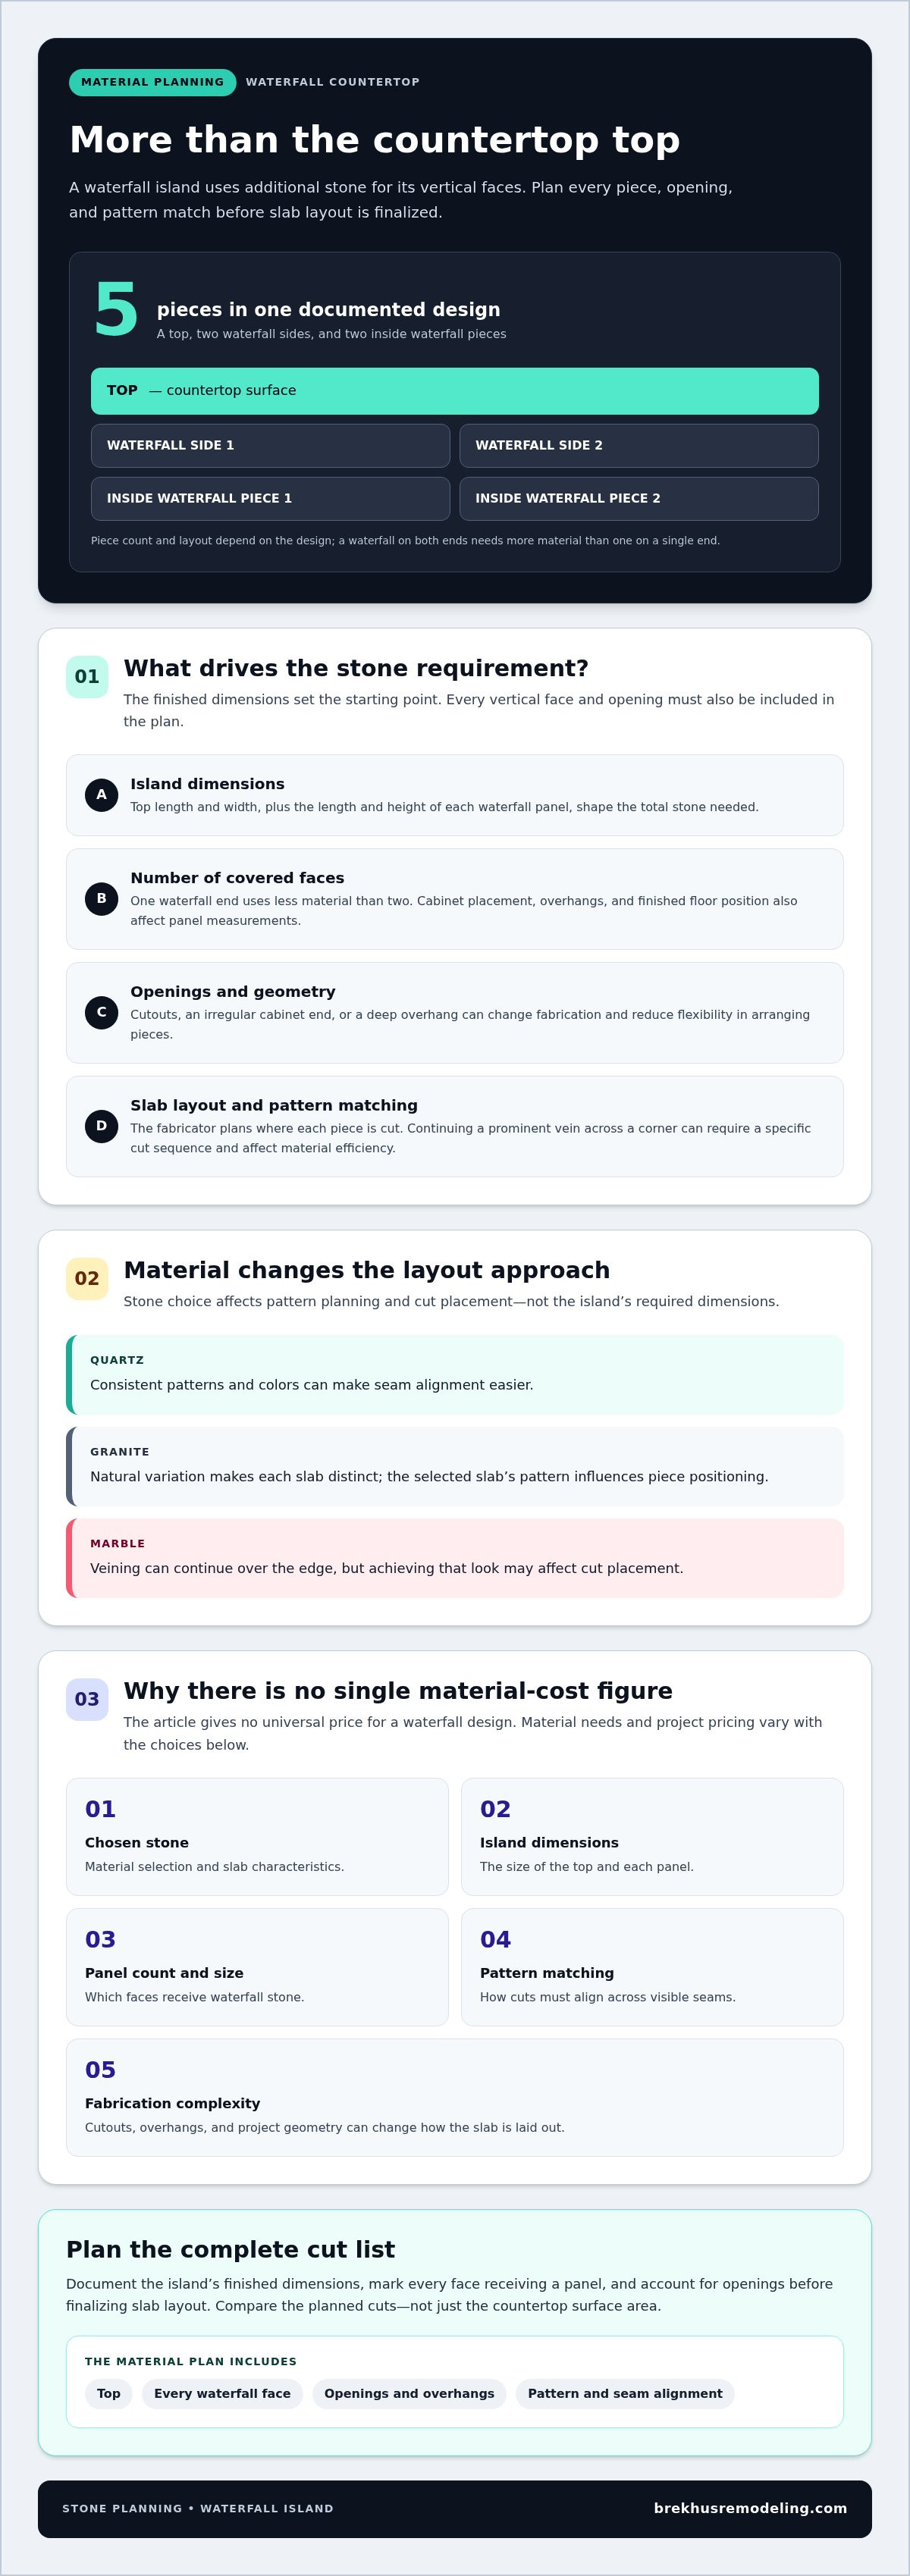
A waterfall island requires more stone than a conventional countertop because the surface continues down its exposed sides. The extra material is not limited to the visible outer panels. One documented island design uses five pieces: a top, two waterfall sides, and two inside waterfall pieces. Each component adds to the slab area needed for fabrication.
The top’s dimensions establish the starting point, while each vertical panel adds its own length and height. A waterfall on both ends needs more material than one covering a single end. Cabinet placement, overhangs, and finished floor position also shape panel measurements. A change in island length or height therefore affects the total stone required, not just the appearance.
Slab layout matters as much as the island’s finished measurements. Fabricators plan where each piece will be cut, then assess whether the chosen slab can provide the top and panels. A pattern that must continue across a corner can limit material efficiency. For example, aligning a prominent vein from the top onto a side may require placing the cuts in a specific sequence.
Quartz has consistent patterns and colors, which can make seam alignment easier. Natural granite varies from slab to slab, so the selected slab’s pattern influences how pieces are positioned. Marble veining can create a deliberate visual continuation over the edge, but that goal may affect cut placement. These material differences influence layout decisions and potential offcuts, rather than changing the island’s required dimensions.
Additional stone needs also depend on the project’s geometry. A deep overhang, irregular cabinet end, or cooktop cutout can alter fabrication and leave less flexibility for arranging pieces. Embedded power or lighting adds complexity around the work surface. The key planning step is to account for every vertical face and opening before finalizing the slab layout.
There is no single material-cost figure for every waterfall design. The total depends on the chosen stone, island dimensions, number and size of waterfall panels, pattern-matching needs, and fabrication complexity. Project pricing is provided after a quote request. Compare slab requirements and planned cuts alongside the visible design, rather than comparing countertop surface area alone.
For a precise estimate of the stone required, document the island’s finished dimensions and identify every face that will receive a panel. Then coordinate those measurements with the slab layout and seam direction. A project involving custom stone cuts may benefit from professional stone installation, particularly when pattern continuity is central to the design.
Benefits of professional installation
A waterfall countertop is not a straightforward do-it-yourself project. Its components require advanced fabrication skills, controlled handling, and accurate fitting. The top must meet the vertical panel cleanly, while exposed edges make small alignment errors easy to see. Granite adds another challenge: its natural patterns vary, so matching the appearance across a corner takes deliberate planning. Professional installation coordinates fabrication and placement.
Precise measurement helps prevent problems before a slab is cut. The installer accounts for the island’s dimensions, cabinet position, finished floor, and each intended waterfall side. For example, a panel measured before flooring is installed may not meet the floor as intended afterward. Appliance openings and other features also affect the cuts. A coordinated plan reduces the risk of uneven panels or misaligned joints.
Material handling is another practical reason to use experienced installers. Large stone pieces are heavy and vulnerable to damage during movement. A waterfall panel must be carried, positioned, and secured without striking cabinets, walls, or finished flooring. Professional installers manage the lifting and fitting as part of the work, minimizing the risk of damage to the stone and surrounding kitchen surfaces.
Fabrication quality determines how well the horizontal top meets the vertical sides. Mitered edges need careful cuts so the joint reads as a continuous corner rather than two mismatched pieces. With granite, the installer must consider pattern direction as well as edge alignment. A prominent vein reaching the corner may need precise placement to create a deliberate visual transition. The same attention applies to cutouts and openings near the edge.
Secure fitting matters once the pieces are positioned. Installers may use fasteners and adhesives to hold waterfall components in place and align them flush. The supporting cabinets must also provide a suitable base for the finished stone. A poorly fitted panel can shift, leave an uneven joint, or expose gaps at the floor. Professional work connects measurement, fabrication, handling, and installation rather than treating them as isolated tasks.
Choose professional installation when the design includes mitered corners, visible natural veining, multiple panels, or built-in features such as a cooktop. These details demand coordination between the slab layout and the island’s final configuration. A skilled fabricator and installer can manage the precision cuts and secure fitting the design requires. The result depends on careful execution from the first measurements through final alignment.
Installing mitered waterfall countertop pieces
Mitered joints connect the countertop top to its vertical sides, carrying the surface across the corner. Their appearance depends on accurate cuts, careful alignment, and a stable cabinet base.
Fitting Mitered Countertop Pieces
A mitered edge is formed by cutting adjoining stone edges at matching angles so they meet at a corner. Installers align the top and side pieces, then use fasteners and adhesives to secure the joint flush. The seam matters because it sits directly in the waterfall edge’s sightline.
Before final attachment, the pieces must be positioned together to assess the joint and the direction of any visible pattern. With natural stone, a vein near the corner can appear interrupted if the cuts are poorly laid out. Quartz’s consistent pattern can make alignment more straightforward, but careful fitting remains essential. The objective is a clean transition, not simply a closed gap.
Each vertical piece also needs to meet the floor and cabinet accurately. A panel that leans or sits unevenly can make the corner appear misaligned, even when the top cut is precise. Installers coordinate the edge, cabinet face, and floor contact as one assembly. This is especially important on an island with waterfall panels on both ends.
Cabinet and Support Requirements
The cabinet base must support the countertop and provide stable attachment points for its vertical pieces. One example island used a base built with 2x4s, two double-wide cabinet boxes placed side by side, and two metal brackets to strengthen the overhanging edge. That example illustrates how the structure can be planned around the stone’s weight and configuration.
Support needs depend on the cabinet layout, overhang, and waterfall placement. A bracket may reinforce an overhanging edge, while the cabinet boxes support the top. Before fitting stone, installers assess whether the cabinet faces create a consistent plane for the side pieces. Uneven cabinet positioning can complicate flush alignment at the mitered joint.
Storage access also needs consideration. A vertical panel can cover an exposed cabinet side, but it should not interfere with doors, drawers, or nearby appliances. For example, a drawer that opens toward a waterfall panel needs enough clearance to operate as designed. Coordinating cabinet configuration and stone position prevents the finished feature from obstructing daily kitchen use.
Installation Time
The time required depends on fabrication readiness, site conditions, and the number of pieces and features involved. A simple island differs from a design with multiple mitered edges, cooktop openings, or complex pattern alignment. Fitting begins only after the pieces and supporting cabinets are ready.
Preparation and installation are separate parts of the project. Measurements guide fabrication, while on-site work includes handling, positioning, aligning, and securing the pieces. A change to the cabinet layout or an opening for embedded power can add coordination. The schedule follows the project’s actual scope, not just the time needed to place the countertop.
Keep the installation area clear of kitchen items and protect nearby surfaces before the stone arrives. Unobstructed access helps installers move each piece into position without interference from appliances or stored materials. Once assembled, the top and waterfall sides must remain aligned as the joints are secured. Planning access in advance supports a controlled installation sequence.
What cabinets and supports are needed for a waterfall countertop?
A waterfall countertop needs cabinetry that supports the horizontal top and provides a stable plane for its vertical panels. Settle the cabinet arrangement before stone fabrication, because the island’s sides, overhang, and panel placement determine how the pieces meet. A well-planned base also preserves access to drawers and doors after the stone is fitted.
Start by reviewing the island as a complete assembly. Check the cabinet boxes, exposed ends, overhang, and locations where the waterfall sides will attach. The top rests on the cabinet base, while vertical panels cover selected outer faces. If cabinet fronts sit unevenly, the stone panels can reveal the discrepancy at the edges or joints. Confirming the layout before fabrication helps coordinate these surfaces.
A documented island example used a base built with 2x4s to support the cabinet bases. It placed two double-wide cabinet boxes side by side and used two metal brackets to strengthen the overhanging edge. These details illustrate one possible configuration, not a universal specification. The required support depends on the island’s design, cabinet construction, overhang, and stone layout.
Support planning should include the countertop’s intended use and any features that interrupt the surface. A cooktop opening, for example, changes the uninterrupted area available for support and requires coordination with the cabinet arrangement. Embedded power or lighting can also affect placement. Account for these elements in the cabinet plan before finalizing cuts, rather than treating them as additions after installation.
Waterfall panels need a sound attachment surface along the cabinet sides. Installers assess whether the exposed cabinet face provides a consistent plane and whether the panel can sit flush against it. Fasteners and adhesives may secure the components, but the assembly still depends on stable cabinetry beneath the top. Floor contact matters too, since an uneven base can complicate panel alignment.
Storage and daily access deserve equal consideration. A cabinet door or drawer should open without striking a waterfall panel, and an overhang should not obstruct nearby movement. For example, a drawer near an island end may need careful coordination with the side panel’s position. Reviewing these clearances alongside the cabinet plan protects both function and the finished profile.
Before stone fabrication, align the cabinet layout, support points, overhang, and appliance openings in one plan. This gives the fabricator clear dimensions and identifies conflicts before the pieces arrive. For a kitchen project involving custom stonework, plan your stone installation around the cabinetry and intended use of the island.
Brekhus Remodeling: Premium Bathrooms
Brekhus Remodeling brings project-wide planning to Custom Kitchens, where countertop design must work with cabinetry, appliances, and the surrounding layout. Consider this next step when a waterfall edge is part of a broader kitchen renovation or when coordinating the island with other updates. Brekhus Remodeling also works on Premium Bathrooms, Custom Shower Installs, and Full Basements, helping homeowners plan substantial residential improvements with attention to finish and function. Clear dimensions, material preferences, and the intended island layout provide a useful starting point for discussing the scope. Contact Brekhus Remodeling to discuss your project, or visit brekhusremodeling.com.
Shape the Next Stage of Your Kitchen
Move from inspiration to a coordinated renovation plan by deciding how the island should serve the room. Consider how it relates to cabinetry, appliance placement, and the way people use the kitchen each day. This direction can guide material selections and help the countertop feel intentional within the larger space, rather than like an isolated feature.
Consider waterfall countertop installation alongside the surrounding kitchen work, especially when cabinetry or other finishes will change. Brekhus Remodeling offers Custom Kitchens for broader kitchen renovation projects, as well as Premium Bathrooms and Custom Shower Installs. Sharing your priorities and renovation scope gives the conversation a practical starting point, whether the countertop is one element of a larger redesign or a focused update.
Contact Brekhus Remodeling today to discuss the next step for your home. A well-planned design can bring clarity to the decisions ahead and help you move forward with confidence.
Frequently Asked Questions
What is a waterfall countertop and how does it work?
A waterfall countertop continues over an exposed cabinet side, creating a vertical stone panel beneath the horizontal surface. The top and side meet at a corner, often with a mitered joint. On an island, the design can cover one end or both, depending on the intended appearance and layout. It differs from a standard overhang, which projects beyond cabinetry without carrying countertop material down the side.
How much does waterfall countertop installation cost?
There is no single cost for every waterfall countertop installation. The total depends on countertop size, chosen material, fabrication and joint complexity, site accessibility, and the condition of the space. A design with extra cutouts or difficult material alignment can require more involved work than a straightforward layout. Project pricing is provided after a quote request, rather than through a universal price range.
What materials are best for a waterfall countertop?
The best material depends on the kitchen’s appearance and maintenance priorities. Quartz provides consistent patterns and colors, while granite offers natural variation from slab to slab. Marble has distinctive veining but is softer and more porous, requiring regular sealing and maintenance. Quartzite is described as resistant to heat and scratches. Consider how the material’s pattern will meet at the corner, since that detail remains visible on the island side.
How do you measure and plan a waterfall countertop?
Measure the island’s finished length, width, and height, then record each side intended for a vertical panel. Map openings for a sink or cooktop and note where seams should fall. For example, plan a panel meeting finished flooring against the final floor level. Also assess walking paths and appliance doors, since usable clearance matters as much as the island’s dimensions.
What are the steps to install a waterfall countertop?
The work generally moves from design decisions to site measurements, fabrication, and fitting. First, establish the island layout and material. Measurements then guide the cuts for the top and side panels. On site, the components are positioned, aligned, and secured to the supporting cabinetry. A final review checks that the joints meet cleanly and the panels sit correctly against the cabinet and floor.
How are waterfall countertop edges and seams joined?
Installers commonly create a miter by cutting adjoining edges so the top and side meet at the corner. They position the pieces to align their edges and visible pattern, then may use adhesives and fasteners to secure the components. The joint should appear flush, without a shifted edge or uneven gap. Natural stone patterns can make alignment more demanding, particularly when a vein approaches the corner.
Can you install a waterfall countertop yourself or should you hire a professional?
Professional installation is the appropriate choice because waterfall countertops require advanced fabrication skills and precise fitting. Large stone pieces must be handled carefully, and inaccurate cuts can cause visible misalignment or damage. A professional installer coordinates the fabricated panels with the cabinet base, then secures and aligns the assembly. This is especially valuable at a mitered corner, where even a small mismatch can interrupt the finished edge.